Docker Images and Creating them
What have I crafted and why?#
I Love Docker and since I’m slowly learning about creating my own images for my own use cases I’m loving the flexibility it opens up to me.
!
ENV Variables
I’ve been playing with adding ENV variables into my images recently these work like sticky notes almost adding personalisation into the container without changing the code meaning you can use the same image for multiple different applications i.e. Pre-Production, Different Content Displayed, Etc.
But Why ?
When I first made my own site it was hosted using a Virtual Windows machine running IIS which worked but wasn’t great windows uses so many resources so the footprint of one website being hosted was huge. So I switched to an Virtual Ubuntu Server running Apache2 this was so much smaller and did the same thing but for each website I wanted it was a lot of work, create a new VM, Update it, Install programs, transfer files for each change. I hated it id already been using docker images for somethings like passbolt and wondered if i could make one that would just host my site then i can add it anywhere as many as i like and use it on my K8S cluster project. And again this was great but when i changed the website i had to rebuild the image and push the updated one to the Docker Hub then tell my docker server to pull the new image to keep everything updated and by the time i had 3 Websites this was crazy.
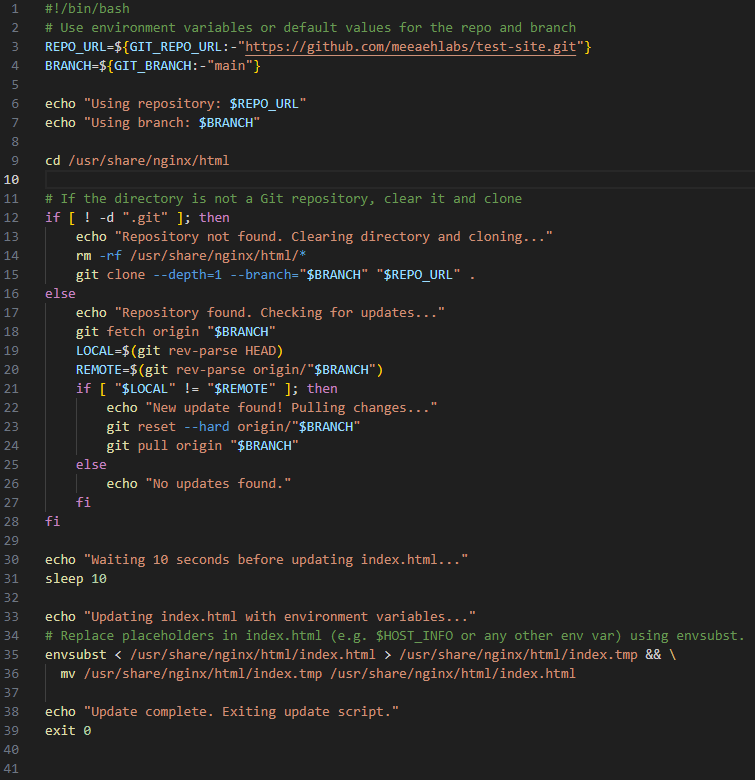
So when i came to make this blog that would be updated much more frequently than any of my static sites i needed to rethink my plan. How can i get frequent updates on the container as is but still make it useful well ENV Variables was the answer and Bash Scripts.
!
The Images#
So then I Created the Image ‘meeaehlabs/static-site:latest’ which could be run with the below command
docker run -d --restart always -p 80:80 \
    -e GIT_REPO_URL="https://github.com/meeaehlabs-uk/staticsite.git" \
    -e GIT_BRANCH="hostinger" \
    --name my-static-site \
    meeaehlabs/static-site:latest
View On Docker Hub For More INFO On How To Run The Image For Yourself Again This was great I could specify which git repo to get the website files from and even the branch in that Repo then it would check for updates every hour and pull and update the site files if there were.
WebHooks While it works its still not the best if for example I was putting this in a Kubernetes cluster I don’t really want 10-15 containers all downloading the same files from the same place, so I’ve got a plan for that in the future. However I still wanted it to be a bit smarter. I use Portainer to manage my docker Server and it has an option to easily add a webhook to a container so when it gets a post notification it re-deploys the container. Now if I make the image in a way that it only pulls website files during start-up and never again I don’t endlessly have it running a script that may crash out and id be unaware.
So now all I need to do is add the webhook to GitHub so when there is an update on the repo it send a Post notification to Portainer who re-deploys the image much simpler and less prone to something going wrong only issue is when its re-deploying the website may be un-reachable for 30 Seconds but for me that is perfectly acceptable.
All the Images#
So with my new found love of using ENV variables in my images making them more flexible I updated some other images I had made a while back.
CIRT (Can I Reach The)
docker run --rm -d \
  -p 80:80 \
  -e HOST_INFO="$(hostname)" \
  meeaehlabs/cirt:latest
This Container simply spins up a webpage that says yes and shows a picture of the word yes i used this to monitor if a server was reachable by adding it as a webpage monitor to MyKuma and setting it to find the text ‘yes’ to confirm the monitor is “Up” you confirm that not only is the system reachable but its working correctly since the webpage is displayed. but i wanted more. In the Command above youll notice a line that says ‘-e HOST_INFO="$(hostname)"’ what this does is gets thew hostname of the server its running on and passes it to a script in the container that updates a placeholder in the HTML file with the server host name. Why? if youve got a few of these running it helps identify where this particular one is coming from, or if you have different Environments in a Kube cluster you can clear the $(hostname) part and instead add your own text like “Main Prod Cluster” or “Main Cluster ENV:PPE” its a simple addition but adds a lot of usability and then you can set you Monitoring Service to find the text you specify on the webpage.
Static-Site
Public Repo Use This Command
docker run -d --restart always -p 80:80 \
    -e GIT_REPO_URL="https://github.com/meeaehlabs-uk/staticsite.git" \
    -e GIT_BRANCH="hostinger" \
    --name my-static-site \
    meeaehlabs/static-site:latest
Private Repo Use This Command
docker run -d --restart always -p 80:80 \
    -e GIT_REPO_URL="https://yourgitusername:[email protected]/example-user/example-repo.git" \
    -e GIT_BRANCH="main" \
    --name my-static-site \
    meeaehlabs/static-site:latest
This container I’m using to host websites you can run the ‘Public Repo’ command and you will see an example website pulled from the specified repo with information for how to edit and change it yourself for your own projects, this image checks every hour for updates and pulls them if an update is found or change the tag to ‘MeeaehLabs/static-site:test’ and this image will check once a minute for updates good for testing in a Pre-production environment like if you want to see how a blog post looks before pushing to your Production repo.
Webhooks And Variables I have since expanded on this idea and wanted a webhook that GitHub would trigger when the repo has an update.
I created three images ‘meeaehlabs/static-site:host’ this image is just to host and serve the static website that you pull from the repo but i also created ‘meeaehlabs/static-site:webhook’ and ‘meeaehlabs/static-site:hookey’ both of these images will wait for a post from the webhook on /trigger-update but the one tagged webhook requires no secret/authentication and the one tagged hookey does require a secret/authentication which can be set-up when running the container with ENV variable ‘WEBHOOK_KEY’
Automate with Webhooks
deploy the image as a stack/swarm with either the tags ‘host & ‘webhook’ for a simple webhook that triggers the update from your repo or use ‘host’ & ‘hookey’ for a webhook that requires a secret you can set with the ENV Variable ‘WEBHOOK_KEY’ below is example of both and how to deploy them.
With a secret
version: '3.9'

services:
  webhook:
    container_name: site-webhook-keyed
    image: meeaehlabs/static-site:hookey
    environment:
      - GIT_REPO=${GIT_REPO}    # e.g., https://github.com/username/repo.git
      - GIT_BRANCH=${GIT_BRANCH}  # e.g., main
      - WEBHOOK_KEY=$(WEBHOOK_KEY) # the secret and webhook url will be shown in the container logs when it first starts up
    volumes:
      - site-content:/site-content
    ports:
      - "5000:5000"   # Exposes the webhook endpoint

  host:
    container_name: site-host
    image: meeaehlabs/staticsite:host
    volumes:
      - site-content:/usr/share/nginx/html:ro
    ports:
      - "80:80"       # Exposes the static website

volumes:
  site-content:
Make sure to add the required ENV variables for your Git Repo (GIT_REPO) and Branch (GIT_BRANCH) and Webhook Key (WEBHOOK_KEY) which will act like a password to use the webhook if none is entered it will sert the default one ImNoTSeCUrE852!!
Without a secret
version: '3.9'

services:
  webhook:
    container_name: site-webhook-NoKey
    image: meeaehlabs/static-site:webhook
    environment:
      - GIT_REPO=${GIT_REPO}    # e.g., https://github.com/username/repo.git
      - GIT_BRANCH=${GIT_BRANCH}  # e.g., main
    volumes:
      - site-content:/site-content
    ports:
      - "5000:5000"   # Exposes the webhook endpoint

  host:
    container_name: site-host
    image: meeaehlabs/staticsite:host
    volumes:
      - site-content:/usr/share/nginx/html:ro
    ports:
      - "80:80"       # Exposes the static website

volumes:
  site-content:
Make sure to add the required ENV variables for your Git Repo (GIT_REPO) and Branch (GIT_BRANCH)